In this part, we will introduce you to SVN and also to some Minix, actually Unix, commands that can make your life in LCOM easier. By the end of this part, you will have added to the SVN repository the code you've developed in the previous section. Before you leave the lab, please make sure that you show that you have achieved this to your instructor.
According to the official documentation Subversion (SVN):
... is a free/open source version control system (VCS). That is, Subversion manages files and directories, and the changes made to them, over time. This allows you to recover older versions of your data or examine the history of how your data changed.
In LCOM, you'll use SVN to keep track of the code you develop for the different labs as well as for the integration project. Furthermore, to facilitate the process of handing in your work, we will grade the version of the code kept by SVN at the time of the deadline of your project. (In this document we use the word project to refer to either the labs in LCOM or its project.) Yet another reason why SVN is useful is that if, as suggested, you create your Minix virtual image in /tmp it will be removed the next time you reboot your (host) system. By using SVN, you can ensure that you do not loose the code that took you so hard to develop.
In order to use SVN you need to understand three concepts:
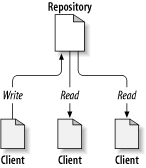
Repository
This is the central store where the different versions of a file system tree, i.e. of the code of your project, are kept. In LCOM the repository is on a server machine that is accessed via HTTP/HTTPS.
Working copy
A working copy is a copy of a file system tree, that originates from a version of that tree in the repository. In LCOM, the preferred approach is that you keep the working copy of your project on a Minix image for the virtual machine you are using. As its name implies this copy may be modified, and as result become different from the version that it originated from.
The number of working copies is arbitrary, facilitating the development in teams:
Src: Ben Collins-Sussman, Brian W. Fitzpatrick and C. Michael Pilato
This can also be useful if for some reason you make your working copy unusable: just create a new one and delete the one that is corrupted (after saving somewhere else the changes that you have made meanwhile).
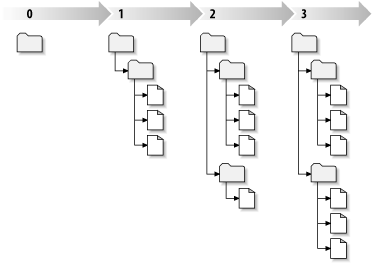
Revision
A revision is a version of the file system tree kept in the repository. It is created by committing to the repository the changes made in a working copy.
Src: Ben Collins-Sussman, Brian W. Fitzpatrick and C. Michael Pilato
In this section we show you how you can use the svn command using Minix's command line interface (CLI), i.e. all commands should be given on Minix not on Linux, to:
add the folder lab0 and its contents to the SVN repository that was created when you enabled Redmine's Repository module upon creation of your Redmine project in Section 3.2;
create a working copy.
All these tasks should be performed as a common user. In particular, all commands in Minix should be executed as user lcom, and not as user root. If you are not yet logged in Minix as user lcom please do it.
6.1 Adding lab0 and its contents to the SVN repository
In LCOM, you will have to create one directory in your group's SVN repository for each lab as well as for your project. So, our next step is to add lab0/ and its content (that you have created in the previous section) to the SVN repository.
Since at this point you do not have a working copy, one easy way to do it is to use SVN's import command. If you have followed the steps in the previous section without mistakes, lab0 directory is under lcom's home directory. So, first change to that directory by typing:
$ cd ~
on a terminal (either VBox's console, or an ssh terminal). Please note that the $ character is the shell prompt for a common user, i.e. a user that is not root, so you need to type only cd ~, not the $ character. Note that Minix has an online manual on many of the commands we'll use in this section. To read the man page of the cd command, you can use the man utility:
$ man cd
no entry for cd in the manual.
The second line, the one without the $ character, is the output of the man cd command, so it looks like that we are out of luck. However, there are many commands for which there is a man page, e.g. the man command itself, and if you are curious about the operation of a given command, just try the man command. If man outputs no entry for ??? in the manual, you can always read the man page on Linux. However, there may be some differences between the operation of the options of a given command on Minix and on Linux. Anyway, do not be afraid to try, unless the command may delete files/directories. But we digress. Let's go back to our goal: add lab0/ to your SVN repository.
You can now add lab0/ and its content to the SVN repository by executing the command:
where lcom1718-t<n>g<xy> is the id of your Redmine project.
Summarizing, the svn import command copies the contents of lab0/ to the repository, to a directory that you specify in the destination URL of the SVN repository: in this case lab0 directly under the root of the SVN repository of the Redmine project of your group, thus also creating a lab0 directory in the SVN repository. Other directories may be imported similarly.
A few comments are in order with respect to this command:
It operates directly on the repository. You need not have created a working copy before. You can give it from any computer that has the svn command.
All commands that interact with the repository require authentication. In Linux/Minix, svn uses the username of the account in which you are logged in, and will ask you only for the password. If that account is different from your account on Redmine/SVN, this is the case in Minix, you should just type the Enter key. svn will then prompt you to enter your username and the respective password. You must use your SIGARRA's credentials.
Commands that change the state of the repository should be given with the -m option followed by a string (in this case "Importing lab0/") summarizing the main changes. This is added to a log on the repository, and will allow to more easily track the changes made to the project. If you do not add this option, the svn command will execute an editor, by default vi, so that you can type in the log message. Since you probably do not know how to use vi, you should try not to forget to use the -m option.
6.2 Creating a working copy
The svn import does not make the original directory, i.e. ~/lab0/ a working copy, but you need a working copy so that you can make changes to the files in the SVN repository. To create a working copy you must use the command svn checkout. You can create a working copy under directory ~/svn, by executing the following commands:
$ mkdir ~/svn
$ cd ~/svn
$ svn checkout https://svn.fe.up.pt/repos/lcom1718-t<n>g<xy>/lab0
The first command, creates a directory named svn under your home directory, ~. The second comand changes the present working directory to the newly created directory. Finally, the third command creates a working copy of lab0 directory under the root directory of the SVN repository of your Redmine project. This working copy appears as directory lab0 under ~/svn, with the contents of the imported lab0/, as you can verify by executing the command:
Please note that all lines but the first are the output of the ls command, which lists the contents of the specified directory. (The output you get, will certainly be different, namely with respect to the dates.) So, the working copy of lab0/contains not only the files in the imported directory, but also directory .svn, which contains the necessary metadata for the svn command to determine what to do when a user invokes it.
6.3 Changing your working copy
Actually, file hello needs not be in the SVN repository as it can be easily generated from hello.c. Thus to save the resources used by the SVN repository you should delete the file hello by giving the following commands:
$ cd ~/svn/lab0
$ svn delete hello
The svn delete command deletes the file from the working copy, as you can check by giving the following command::
However, the actual deletion from the repository occurs only after executing the svn commit command, as you can check by refreshing the Repository tab of your Redmine's project web page. Thus, if meanwhile you change your mind, you can undo the deletion by executing the command:
$ svn revert hello
Try it, and check, using the ls command. However, this is not what we want in this case. So, let's delete the hello executable and commit it to the repository:
$ cd ~/svn/lab0
$ svn delete hello
$ svn commit -m "Removed executable copied by svn import"
Note that the first command cd ~/svn/lab0 is just to make sure that you give the svn delete hello command inside the directory of the working copy that contains file hello. If you have executed only the commands we have asked you to execute, this should be the case. You can check it using the pwd (present working directory) command:
$ pwd
/home/lcom/svn/lab0
Once you have deleted the hello file and committed that change, you can check that that file is not on the repository anymore by refreshing the Repository tab of your Redmine's project (check lab0/ directory) web page. Alternatively you can use the command:
$ svn status
$
As shown above, it does not output anything, meaning that your working copy is up-to-date.
At this point, you can check the log of the changes made to your SVN repository using the following command:
This illustrates the importance of using meaningful log messages when you commit, so that later, if you need, you can locate the changes of interest.
6.4 Deleting your working copy and creating a new one
To finalize this introduction to SVN, we'll show you that the working copy is disposable. Indeed, you can eliminate it and later create another one by using the svn checkout command. Actually, you can have two (or more) working copies simultaneously on the same computer. This can be very useful as sometimes you mess up with your working copy (don't ask me how) in such a way that you are unable to commit. The easiest solution in this case is to create a second working copy and to move the changes done in the first working copy to the second working copy, and then commit these changes from the second working copy, after which you can delete the first working copy
Here, we'll do something different: first, we will remove the working copy created above and then create a new working copy. To eliminate the working copy you can execute the following commands:
$ cd ~/svn
$ rm -r lab0
Remove contents of lab0? y
Remove contents of lab0/.svn? y
Remove contents of lab0/.svn/text-base? y
Remove lab0/.svn/text-base/hello.c.svn-base? (mode = 444) y
Remove directory lab0/.svn/text-base? y
Remove contents of lab0/.svn/prop-base? y
Remove directory lab0/.svn/prop-base? y
Remove contents of lab0/.svn/props? y
Remove directory lab0/.svn/props? y
Remove contents of lab0/.svn/tmp? y
Remove contents of lab0/.svn/tmp/text-base? y
Remove directory lab0/.svn/tmp/text-base? y
Remove contents of lab0/.svn/tmp/prop-base? y
Remove directory lab0/.svn/tmp/prop-base? y
Remove contents of lab0/.svn/tmp/props? y
Remove directory lab0/.svn/tmp/props? y
Remove directory lab0/.svn/tmp? y
Remove lab0/.svn/entries? (mode = 444) y
Remove lab0/.svn/all-wcprops? (mode = 444) y
Remove directory lab0/.svn? y
Remove lab0/hello.c? (mode = 644) y
Remove directory lab0? y
The last command, rm -r lab0, removes recursively, hence option -r, all directories and files under lab0/ and finally removes lab0. As it deletes each file or directory, it asks you to confirm if that is what you want, as shown above. Just type y, for yes. You can check that you have no working copy using:
$ cd ~/svn
$ ls -la
total 2
drwxr-xr-x 2 lcom operator 256 Sep 21 19:50 .
drwxr-xr-x 5 lcom operator 448 Sep 21 11:57 ..
I.e. the ~/svn directory has only two entries: one for itself, denoted . (single dot), and one for its parent directory, denoted .., i.e. double dot. To recreate a working copy you can invoke:
$ cd ~/svn
$ svn checkout https://svn.fe.up.pt/repos/lcom1718-t<n>g<xy>/lab0
(Do not forget to replace <n> and <xy> with the appropriate values.) This time a working copy of lab0 with only hello.c will be created, as you can check giving the command:
In this section, we have covered quiet a lot about both the svn commands and the most common Minix (Unix/Linux) commands. Both new svn commands and new Minix commands will be introduced as needed. Here is the last Minix command for this lab:
$ shutdown -h now
which shut downs the Minix image in an orderly fashion. After that, you can terminate the VBox VM, by selecting the Close option of the File menu. As a result, VBox will show you a dialog box. Just select the "Power off the machine" option, and then press the OK button.
"That's all folks!" (for today). Before you leave the room:
show your lab's instructor the contents of your SVN repository;