Computer Labs
LCOM's Development Process: SVN Tutorial
1. Introduction
According to the official documentation:
Subversion is a free/open source version control system (VCS). That is, Subversion manages files and directories, and the changes made to them, over time. This allows you to recover older versions of your data or examine the history of how your data changed.
In LCOM, you'll use SVN to keep track of the code you develop for the different labs as well as for the integration project. Furthermore, to facilitate the process of handing in your work, we will grade the version of the code kept by SVN at the time the deadline of your project. (In this document we use the word project to refer to either the labs in LCOM or its project.) Yet another reason why SVN is useful is that if, as suggested, you create your Minix virtual image in /tmp it will be removed the next time you reboot your computer. By using SVN, you can ensure that you do not loose the code that took you so hard to develop.
In order to use SVN you need to understand three concepts:
- Repository
- This is the central store where the different versions of a file system tree, i.e. of the code of your project, are kept. In LCOM the repository is on a server machine that is accessed via HTTP/HTTPS.
- Working copy
- A working copy is a copy of a file system tree, that originates from a version of that tree in the repository. In LCOM, the preferred approach is that you keep the working copy of your project on a Minix image for the virtual machine you are using. As its name implies this copy may be modified, and as result become different from the version that it originated from.
The number of working copies is arbitrary, facilitating the development in teams:
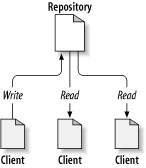
Src: Ben Collins-Sussman, Brian W. Fitzpatrick and C. Michael Pilato
This can also be useful if for some reason you make your working copy unusable: just create a new one and delete the one that is corrupted (after copying the changes that you have made meanwhile).
- Revision
- A revision is a version of the file system tree kept in the repository. It is created by committing to the repository the changes made in a working copy.
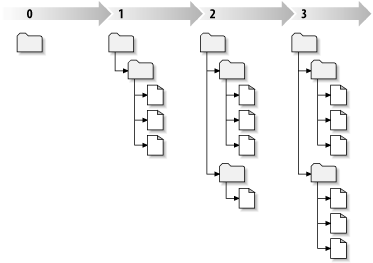
Src: Ben Collins-Sussman, Brian W. Fitzpatrick and C. Michael Pilato
In these notes we show you how you can use the svn command using Minix's command line interface (CLI) to perform virtually all SVN tasks you need in LCOM.
All these tasks should be performed as a common user. In particular, all commands in Minix should be executed as user lcom, and not as user root.
2. Common SVN Tasks
2.1 Creating the repository
The first task on a repository is its creation. In LCOM, the repository for your project is created automatically for you when you enable Redmine's Repository module for the first time.
2.2 Creating the repository structure
In LCOM, you should create a directory per project under your repository's root directory, so that eventually its structure will be as shown in the figure (with the directories other than lab1 also populated):

This structure can be created in various ways. For Lab 2, our suggestion is that you create its own directory by downloading the archive with all the development files we made available for that lab to the host operating system and then uncompressing it:
unzip lab2.zip
You can also perform these two steps (downloading and uncompressing the archive) directly in Minix. This is described in Annex 1.
This should have created a new directory inside your current directory named lab2. Next, you can import that directory to the SVN directory of your LCOM project as follows:
svn import lab2 https://svn.fe.up.pt/repos/<proj_id>/lab2 -m "Import of code provided for Lab 2"
where <proj_id> is the id of your LCOM project (on Redmine). (Remember that all id chars are lower case.) Other directories may be imported similarly.
A few comments are in order with respect to this command:
- It operates directly on the repository. You need not have created a working copy before. You can give it from any computer that has the
svn command.
- All commands that interact with the repository require authentication. In Linux/Minix,
svn uses the username of the account in which you are logged in, and will ask you only for the password. If that account is different from your account on Redmine/SVN, this is the case in Minix, you should just type the Enter key. svn will then prompt you to enter your username and the respective password.
- Commands that change the state of the repository should be given with the
-m option followed by a string (in this case "Import of code provided for Lab 2") summarizing the main changes. This is added to a log on the repository, and will allow to more easily track the changes made to the project. If you do not add this option, the svn command will execute an editor, by default vi, so that you can type in the log message. Since you probably do not know how to use vi, you should try not to forget to use the -m option.
2.3 Creating a working copy
The proposed approach is that you keep your working copy on Minix. Furthermore, we assume that you will create the working copy of each project directly under the home directory of user lcom, and that this will take place after creating on the repository the directory for the project, as described in the previous section.
Under these assumptions, you just need to give the following svn command on a shell in Minix (I recommend that you use a remote shell, using ssh ):
$ svn checkout https://svn.fe.up.pt/repos/<proj_id>/lab2 lab2
Remember that $ is the shell prompt for user lcom, or any user different from root, i.e. you should not execute this command as user root.
As a result of this command, a new directory named lab2 will be created. This directory is an SVN working copy for Lab 2. You can check that that directory was indeed created by giving the command:
$ ls -R lab2
where the -R option (in Minix, it must be upper case) asks ls to list the contents of the entire directory tree rooted at lab2
The development of Lab 2 should be done on this copy, using Eclipse's RSE, as described in Section 5 of Lab 0's handout.
2.4 Adding your code to the repository
The changes that you make to the files in your working copy are not automatically propagated to the repository. For that to happen, you need to explicitly commit your changes to the repository. As mentioned above, every time you commit your working copy to the repository, you create a new revision, or version.
It is a good idea that you develop your code incrementally, and that you commit your work to your repository as you do it. I.e. you should commit your work to the repository after writing and testing each of the functions we request you to write. For example, in Lab 2, after developing and testing the first function, timer_get_conf(), you should commit your work to the repository by executing, for example, the command:
$ svn commit -m "timer_get_conf() completed"
Note that:
- You should give this command inside your working copy
- You should include a meaningful log message, to help you track your work
- You need not specify the URL of the repository
2.5 Adding new files or directories
In the first labs it is unlikely you will need to add new files, much less new directories, to those initially imported to the repository. Nevertheless, if you need to do it, this can be done in a 3 step process:
- Create the file/directory, e.g. using RSE.
- Adding the file/directory to the working copy.
- Commit your working copy to the repository
To illustrate this process, let's assume, e.g., that you wish to add a directory to your working copy for documentation, docs. So, in this case, you can perform this step by giving the following command in the desired directory of your working copy:
$ mkdir docs
This command just creates a new directory named docs, but it does not add it to your working copy. I.e., you may have files or directories in the directory containing your working copy that are not managed by svn. To put them under svn you need first to explicitly add them to the working copy. So to add docs to your working copy you should give the following command, in its parent directory (which should already belong to your working copy):
$ svn add docs
This command adds to the working copy not only the directory docs/ but also any files that it contains when the directory is added. Files created afterward, will not be added to the working copy.
A directory/file added to a working copy, will be added only to the repository, the next time you commit your working copy. If you change your mind, and do not want your directory/file added to the repository the next time you commit your working copy, you have to execute the following command:
$ svn revert docs
Note that the revert command can also undo changes to a file that is already in the repository. So, be careful when using it, to avoid losing your work.
2.6 Checking the status of your working copy
If you wish to check the directories/files of your working copy that have been modified or added (or deleted) you can execute the following command:
$ svn status
2.7 Updating your working copy
If you, or the partners of your groups, use several working copies during some time interval there is a possibility of one of those working copies to become out of date. I.e. that some files or directories in that working copy become different from the respective repository files or directories, not because they were modified locally, but because they were modified on the repository by a commit of another working copy.
In these scenarios, in order to bring your working copy in sync with the repository, you can execute the following command:
$ svn update
On the B-building PC's, if you are keeping the Minix image in /tmp it is unlikely that you will ever need to update the working copy, because most likely these PCs will be rebooted, and you'll lose your Minix image.
On the other hand, if you and your group partner work simultaneously, each on his/her own working copy, the update command will be useful. In this scenario however, you should be careful not to create conflicts, which then need to be handled manually.
3. Conclusions
This tutorial only covered the commands that we believe will be most useful in LCOM. SVN is a rather complex tool, and we have only scratched the surface. You can perform many of the tasks described above, using different commands.
Our purpose was just to give you a first push. Now, it is up to you to explore by yourself SVN's capabilities. As a starting point, I suggest that you browse the SVN Red-bean book.
Remember that we will grade only what you submit via SVN. Furthermore, use of SVN in the project will be graded. We will focus mostly on the frequency of your commits and on the quality of the log messages. If you try to adopt good practices right from the beginning, appropriate use of SVN will come to you naturally once you get to the project.
We hope that during this course, you'll become adept of version control systems and use them in future courses. There are many other tools like SVN, and most of them are available for Windows, Linux, MacOS and other Unix-based operating systems. In particular, in Windows, there are several SVN clients from GUI-based, such as Subversive, Eclipse's plug-in, to command line clients, e.g. win32svn, and shell extensions, e.g. TortoiseSVN. In Linux, we suggest that you search for SVN clients available via the package management system of your Linux distribution.
Annex 1. Performing all steps directly in Minix
All steps described in this tutorial, but those until the checkout of the repository in Section 2.2, Creating the repository structure, are supposed to be executed in Minix. The steps to import Lab 2 directory tree to the repository were suggested to be executed on the host OS (i.e. either Linux or Windows). But you can also execute them in Minix as we describe next. So, in this annex we assume that you are using Minix, and that you are in the home directory of user lcom.
The steps that you'll need to perform are as follows:
- Download the archive we provide with Lab 2 directory tree to Minix
- Uncompress that archive
- Import Lab 2 directory tree into the repository
- Rename the directory tree created in step 2.
- 1. Download the archive
To download the archive directly to Minix just execute the following command:
$ curl -k -L http://web.fe.up.pt/~pfs/aulas/lcom2017/labs/lab2/lab2.zip > lab2.zip
It will create a file with name lab2.zip in your current directory. You can check that it is there by listing its content using the command:
$ ls
- 2. Uncompress the archive
To uncompress the archive you should give the command mentioned in Section 2.2:
$ unzip lab2.zip
This command will create a directory tree rooted at a new directory with name lab2 in your current directory. Again, you can use the command ls both to check that it is there and to check its content:
$ ls -R lab2
The -R option (in Minix, it must be upper case) asks ls to list the contents of the entire directory tree rooted at lab2
- 3. Import Lab 2
Again, to import the directory tree into the SVN repository of your project just execute the respective command from Section 2.2:
$ svn import lab2 https://svn.fe.up.pt/repos/<proj_id>/lab2 -m "Import of code provided for Lab 2"
where <proj_id> is the id of your LCOM project (on Redmine). (Remember that all id chars are lower case.)
- 4. Rename the directory tree
The previous step adds the directory tree rooted in lab2 to your SVN repository, but it does not make that directory tree a working copy. For that, you'll need to use the checkout command as described in Section 2.3. However, if you try it after executing the steps above, it will fail, because lab2 already exists and has files with the name of files that are in the repository.
Thus, so that you can create a working copy as described in Section 2.3, you should rename the root directory of the directory tree you just imported using, for example, the following command:
$ mv lab2 lab2.nosvn
Alternatively, you could remove lab2. The advantage would be to save some disk space. But the space taken by lab2 is pretty small, and this way you'll keep the original files in Minix just in case you need them. (Of course, you also have the archive and could still recover, but it would be less convenient.)