Computer Labs 2014/2015 - 1st Semester
Lab 0: LCOM's Development Environment
1. Objectives
The objectives of this lab are threefold. First to introduce you to Redmine, a project management tool. Second, to create a project on Redmine for your LCOM group. Third to introduce and to configure the development environment that will be used throughout this course. The last objective can be decomposed in two: first to configure a virtual machine (VM) VMware Player with the Minix 3.1.8 image you'll use in this course; second to configure Eclipse's Remote System Explorer (RSE) plugin so that you can use an Integrated Development Environment (IDE) to develop Minix programs, even if the Minix image you'll be using has no IDE installed.
2. What to Do
Essentially, you have to do the following:
- Create a Redmine project for your group
- Configure a VM on VMware Player with the image of Minix 3.1.8 locally available.
- Configure the RSE to allow the development of programs in Minix on the host OS
- Develop with Eclipse a short program of your choice on Minix and test it
2.1 Class Preparation
This lab class is not very demanding. Nevertheless, it will be more productive if you do some homework before. In particular, I suggest that you watch the following Redmine tutorials on YouTube:
- Redmine Intro - 2 - Managing Users
- Very useful, as you'll have to add members to the project in a very similar way
- Redmine Intro - 3 - Repositories
- Rather comprehensive. In FEUP, we can only use SVN, so you can ignore the details about GIT (i.e. the last 10 minutes of this 15 minutes presentation). Note also that details at FEUP are slightly different, as detailed below.
- Redmine - Guided Tour
- Overview of some redmine features useful for tracking a project's activity. You don't have to use them in LCOM, but you may wish to play with them.
You should also read some notes on how to login in the VMware's Minix image, so that you can more easily do it during the lab class.
Finally, you may wish to check the first two of a set of tutorials on Minix written by Henrique Ferrolho, an LCOM's student last year. These first two tutorials cover pretty much the same ground as this handout, except Redmine, and you may find there some details that I have omitted here.
3. Setting up Redmine
Redmine is a Web-based project management tool. Although it can be used for the management of general projects it is specially suited for the management of software projects.
Most Redmine's functionality is provided by modules that you can enable/disable as needed on a per project basis. You can even temporarily disable a module and later reenable it, without loss of the data that module kept for your project.
In LCOM you are required to use the following two Redmine modules:
- Repository
- This is the main functionality we are interested in. In FEUP, by enabling this module you link your project to a Subversion (SVN) repository, which can be used to keep track of your source code. We will introduce the capabilities of SVN in a later lab, for now it suffices to say that it enables you to keep several versions of your source code, so that you can easily try new ideas and undo them if they do not work as expected.
- Documents
- This is a module that allows to manage a project documentation. You will have to use it for the documentation (Proposal, Specification and Final Report) of your final integration project.
As for the other modules, e.g. Issues or Wiki, you are not required to use them, but we recommend that you take advantage of this opportunity to explore the capabilities of a Project Management Tool. Please check the 4th YouTube video listed above for an overview of the use of some of those modules in the management of SW projects.
3.0 Logging in Linux
All lab classes of this course will take place in Lab B107. The development environment for LCOM is installed both on Linux and MS Windows, but we have not tested the latter. Therefore, we recommend that you use the former. Furthermore, all handouts will assume that you are using Linux. (The details for windows, will surely differ.) So, if you choose MS Windows, you'll be on your own.
To login on the PCs in B107, you should use your FEUP's account and respective password. Once logged in, you can fire-up a web-browser and point it to https://redmine.fe.up.pt/.
3.1 Redmine User Registration
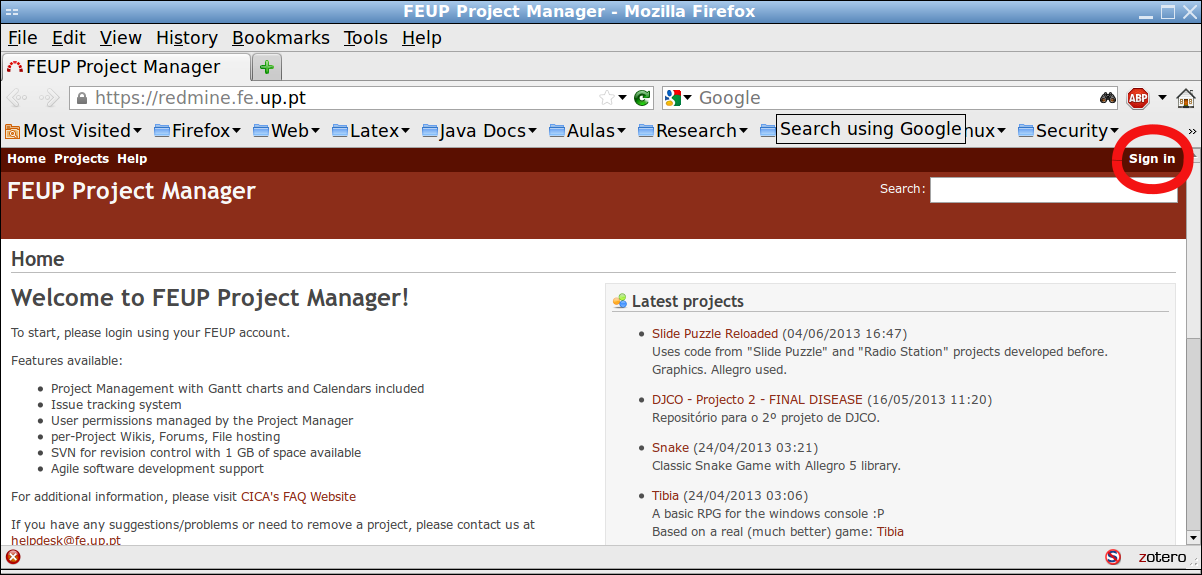
In order to use Redmine in FEUP, you must register first. This is done automatically when you log in for the first time in https://redmine.fe.up.pt/, by clicking on the Sign in option on the top right of Redmine's homepage at FEUP and entering your FEUP's credentials (username and password).
If the login is successful, and you have not registered on Redmine yet, the web browser will show a form that you will need to fill in with your personal data, in particular your given name, your family name(s) and email address. The names you provide are essential as they are used for adding members to a project, as described below.
3.2 Redmine Project Creation
Throughout this semester each group will use a single Redmine Project. This Project will be used not only for the final integration project but also for each of the lab classes. Thus, your next task is to create a Redmine project for your group.
Note: There must be only one Redmine project per group. Therefore only one group member needs to follow the remaining instructions in this Section.
IMPORTANT Please follow the instructions in this section very carefully. This is very important to ensure that we will find your submissions where we expect them to be. If not, we will not be able to grade them and therefore you will get no credit for your work. This may look too harsh, but there are more than 70 groups in the course and if each group decided to place its submission where it pleased it, we would waste a lot of time just to get a copy of your submitted work. We need you to help us make a productive use of our time; you will also benefit from it. Thanks.
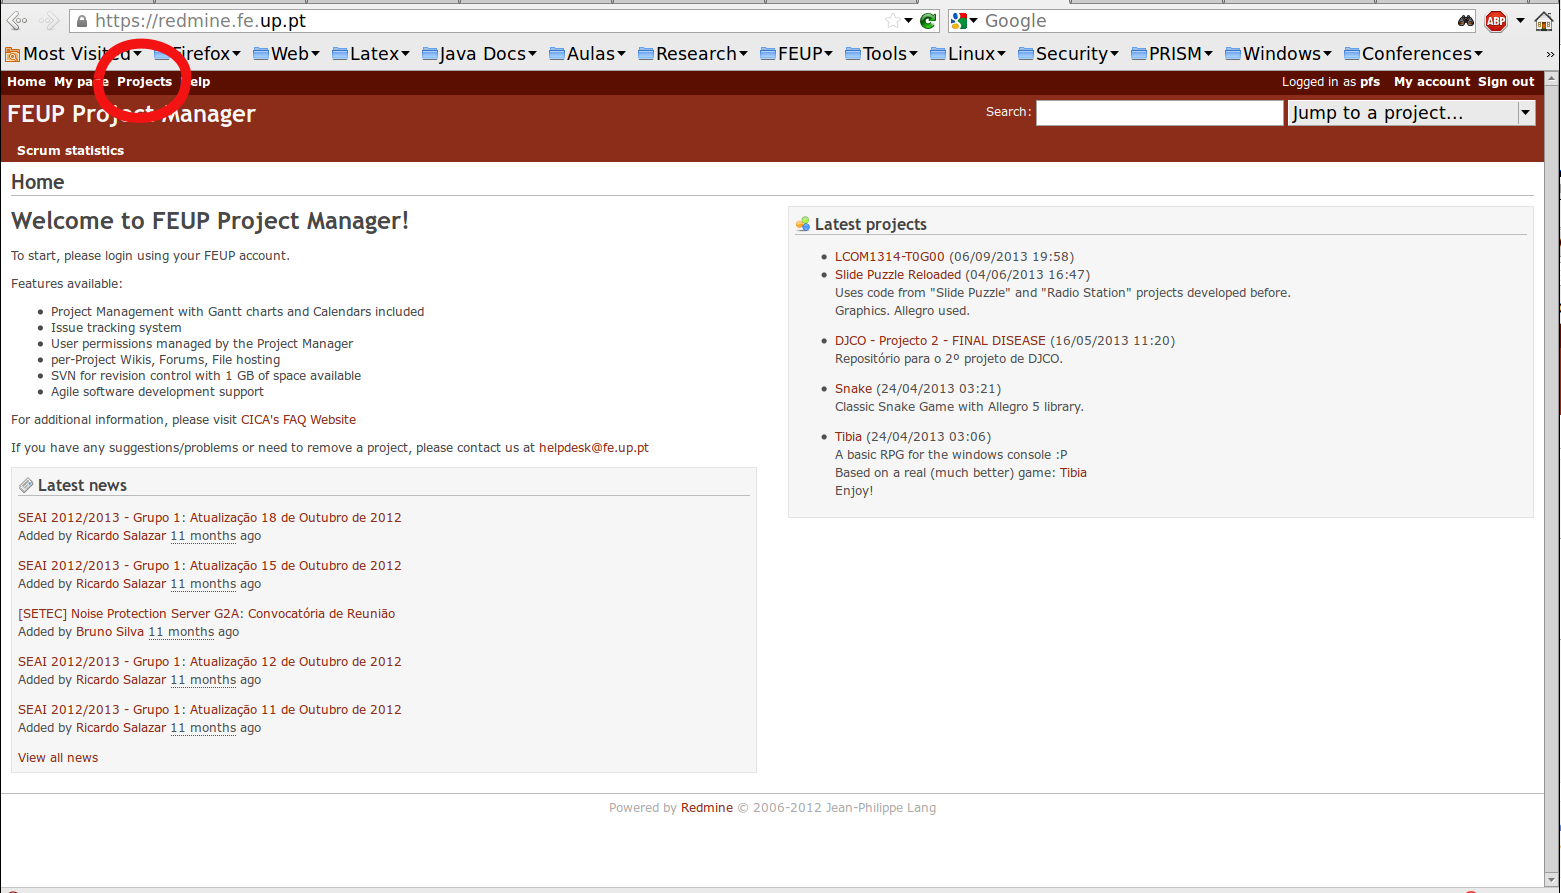
In order to create your group's project, once you are logged in FEUP's Remine, select the Projects option at the top left of the Web page.
Once on the Projects-page, select the New project link on the top right of the white region of the page.
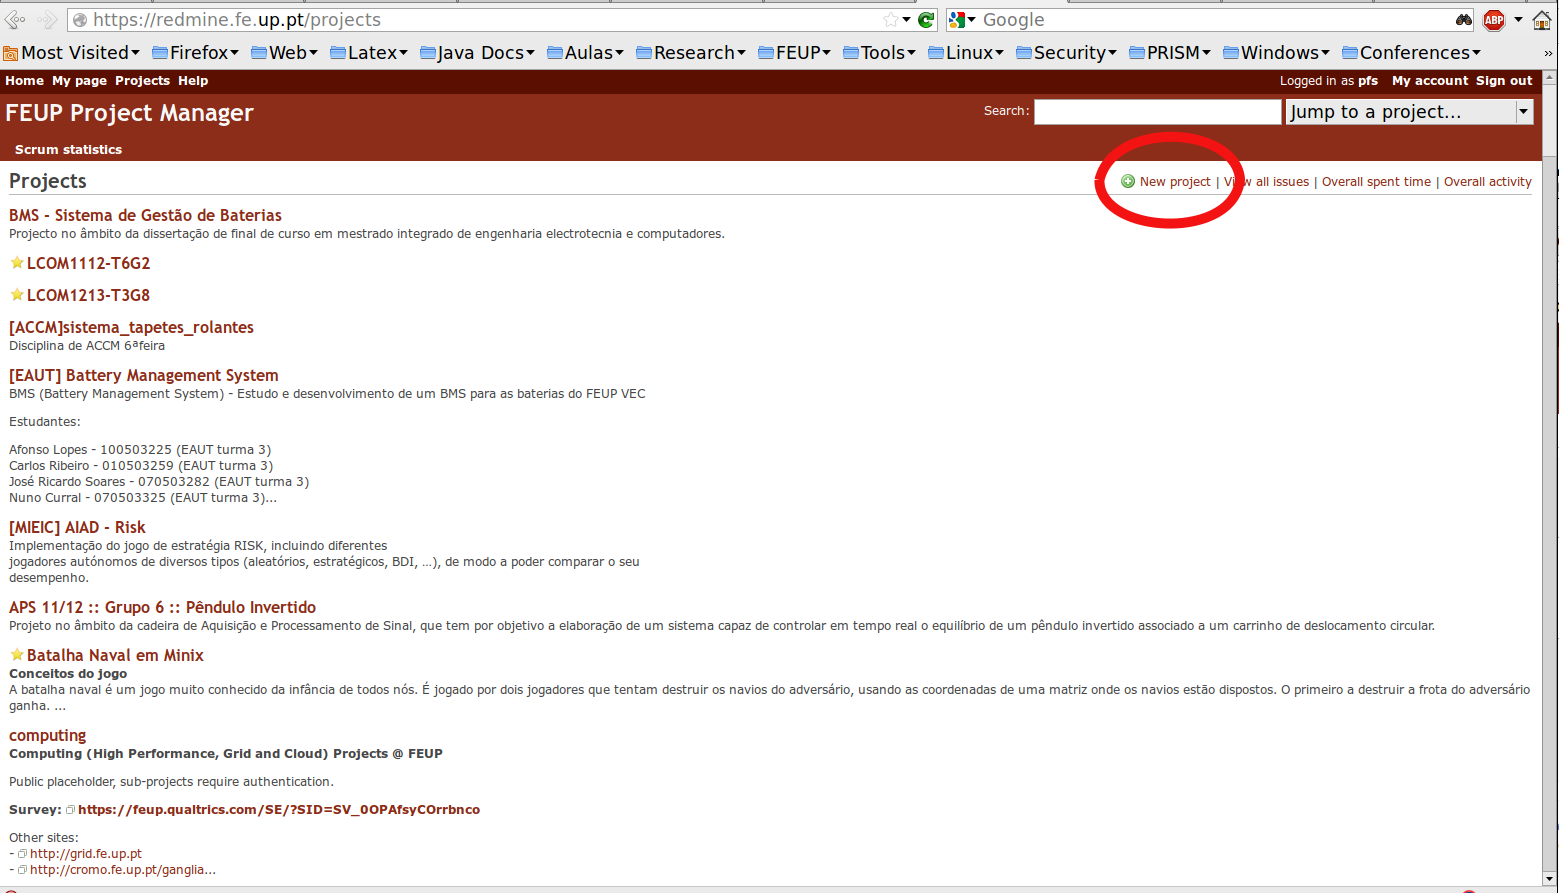
This will show the New Project form:
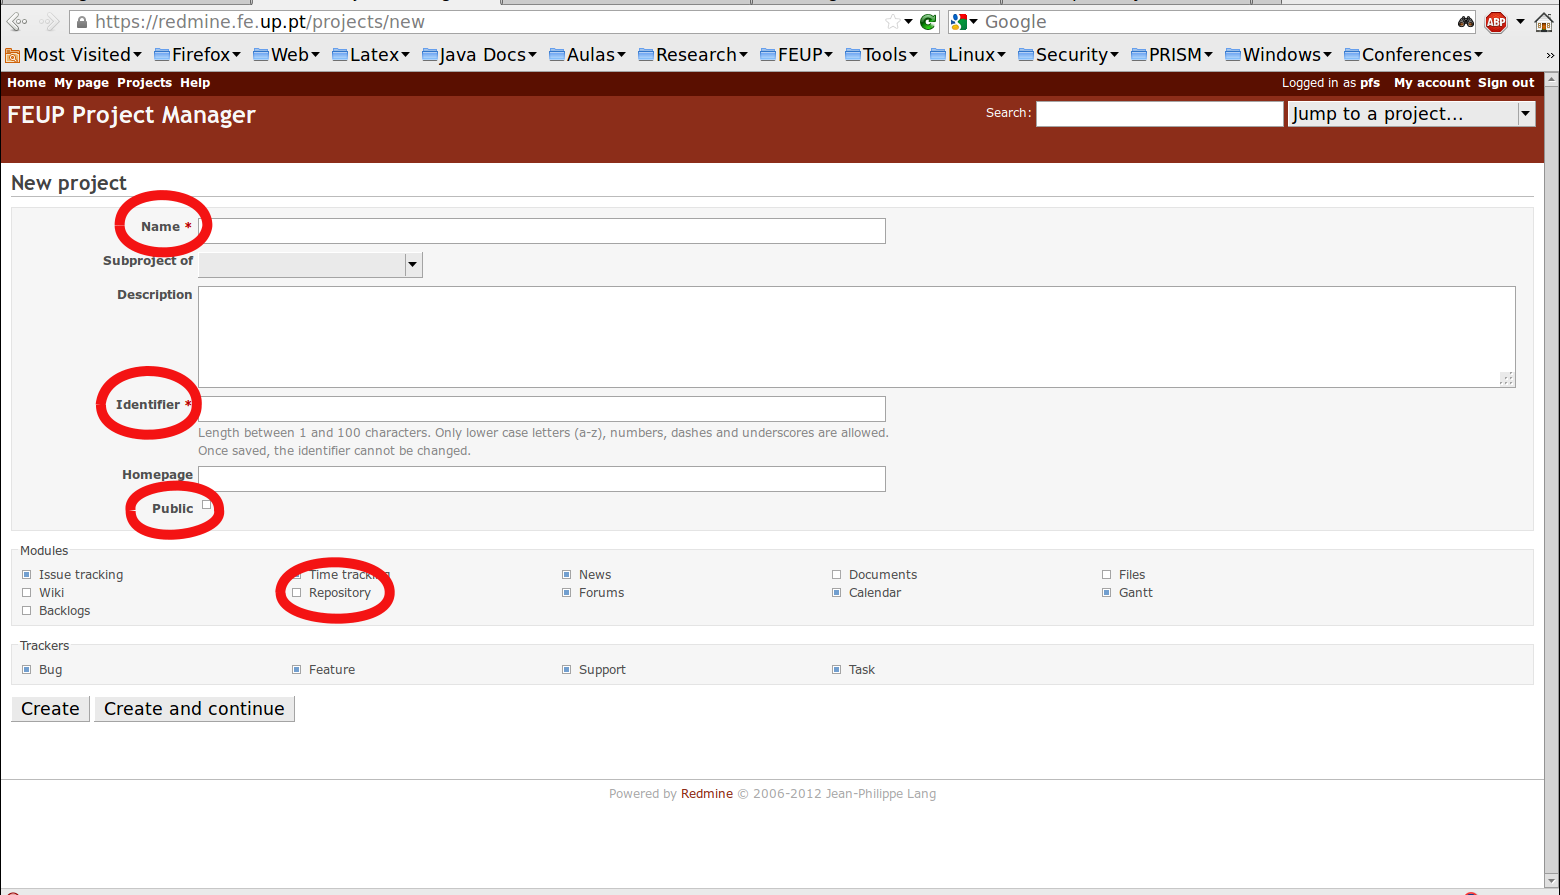
You need only to fill-in the required fields:
- Name
- This is the name of your project. For the sake of uniformity your project's name must be LCOM1415-TnGxy where
- n
- is the section number (número da turma), only one digit
- xy
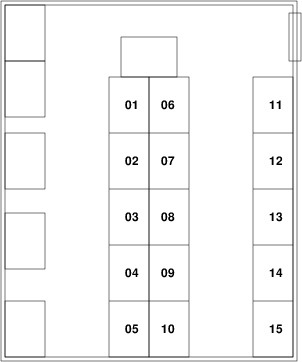
- is a two digit group number, e.g. 01 or 10. (This may look picky, but by using a two digit group number we can more easily sort the groups by their number.) The number of your group should be chosen according to the B107 computer you are using, as shown in the lab plan below.
Please be careful to avoid "stealing" the number of a neighbor group. If another group used "your" group number, Redmine will complain, and you should ask the groups around you if they are using your group number, and if so, you should use the number that group should have used.
Please, for the sake of securing a group id for you, in this class sit only on the desks with numbers in the room plan above. (Note also, that the computer on the windows row, i.e. the one without numbers, closest to the white board is a server. You should never try to login on that computer, much less switch it off.)
- Identifier
- This is an internal identifier that is also used in the URL of the SVN repository. For the sake of uniformity, this must be identical to the project name, but in lower case. E.g. if the name of the group determined by the above rules is LCOM1415-T1G03 then the identifier must be lcom1415-t1g03.
IMP. the project identifier is unique and it cannot be modified after the project has been created. Be extra careful when entering this field, and double check that you are following the rules stated here.
Please leave the Public box unchecked: this ensures that only project members have access to your project. This is important to prevent other students to take unfair advantage of your hard work. It is your responsibility to prevent this from happening, and we may penalize your grade if another group submits code very similar to yours.
Furthermore you must select the Repository module, by checking the respective box. This is critical
so that the SVN repository is automatically created and linked to your project.
To avoid mistakes, I suggest that you leave the other boxes with their default values. As already mentioned, you can enable/disable them later, if needed.
You can now click on the "Create" button, to create your Redmine project. The project will be created immediately, but the creation of the SVN repository may take a few minutes as it is done by a script that is run periodically in the background. In any case, you won't need to use the repository until the next week. So you need not wait: you can check if the repository was correctly created after the next task, i.e. adding the project members.
3.3 Adding Project Members
Whoever created the Redmine project will be automatically added as a project member in the role of Manager. If you are the manager, you should now add the other project members, and specify their roles.
The role of a member is used for access control and determines which operations the group member may perform. Redmine supports 3 roles, whose main capabilities of interest are as shown in the following table:
| Role | Capabilities of interest |
| Manager | No restrictions. E.g. can enable/disable Redmine modules for the project or change project membership. |
| Developer | May change the SVN repository. For example, update or delete source code files or add new source code files. |
| Reporter | May read contents in the project or in the SVN repository, but cannot change anything in the project or the repository. |
A project member may have more than one role.
Your project will have mainly two types of members:
- Group members
- These are the members of your LCOM group. You can assign all the group members the Manager and Developer roles.
- Course instructors
- These are all course instructors, not only the instructor of your class section, as we will distribute the grading tasks among us. Therefore, we all must have read access to your project, and thus you should assign us the Reporter role.
In order to add members to the group you have to select the Settings tab of your newly created project. It looks like this:
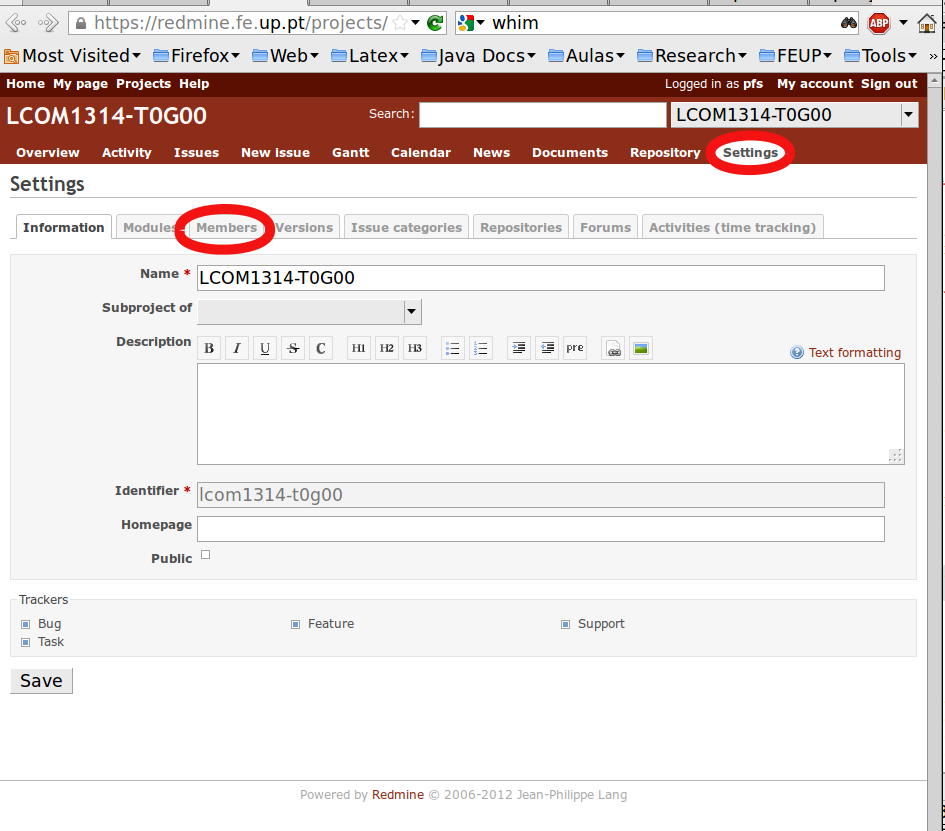
Inside that tab you need to select the Members tab, which will bring a page like the following:
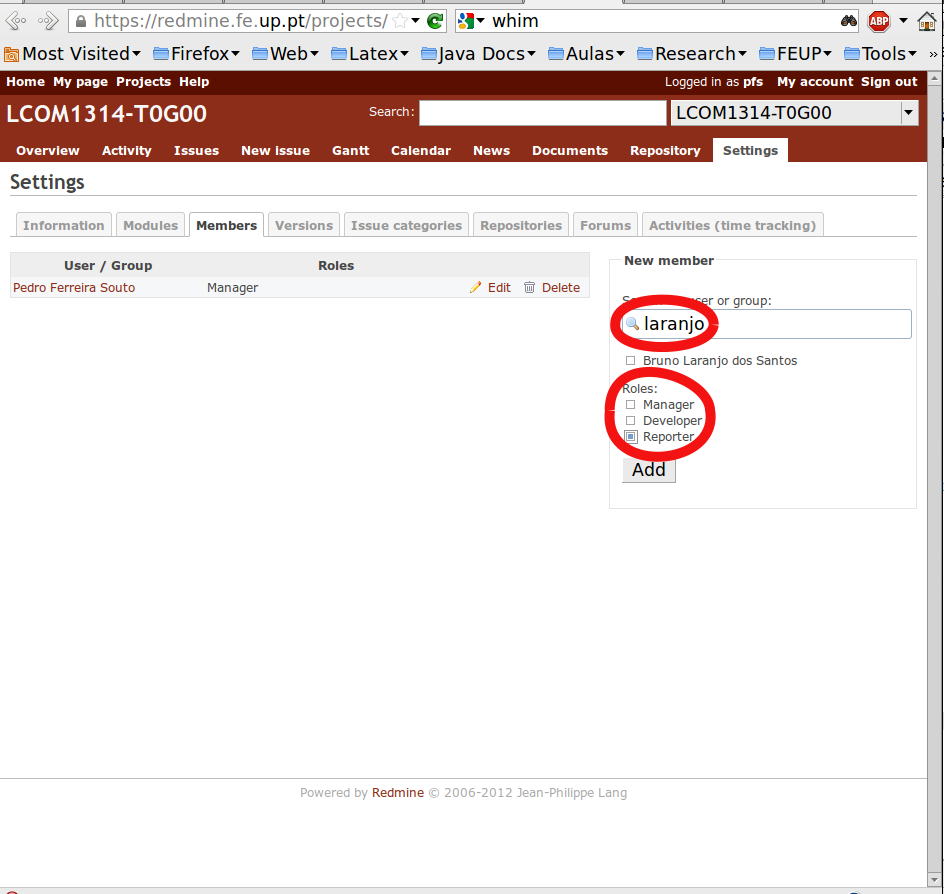
At this point you should add one member at a time. In order to select a member you should enter the login name that member provided when (s)he registered on Redmine (see Section 3.1). This way, you should get a sufficiently short list to scan. Once you have found the desired user, check the corresponding box and select their roles by checking the appropriate boxe(s). (You must specify at least one role. Failing to do that, may block further access to Redmine in the same browser session.) Finally, you must click on the Add button to add that user as a member with the chosen role(s).
The name of the instructors of the course and the login with which they have registered on Redmine are as follows:
- Bruno Laranjo (dee12013)
- Diego Jesus (diegojesus)
- José Pinto (zepinto)
- Leonel Dias (leoneldias)
- Mário Cordeiro (pro11001)
- Pedro Ferreira do Souto (pfs)
3.4 Checking the SVN Repository
Adding the group members should have taken more than enough time for the SVN repository to be created. Therefore, you can check now if everything is working as expected. To do that select the Settings option of your project again.
Inside that tab you need to select the Repositories tab, which will bring a page like the following:
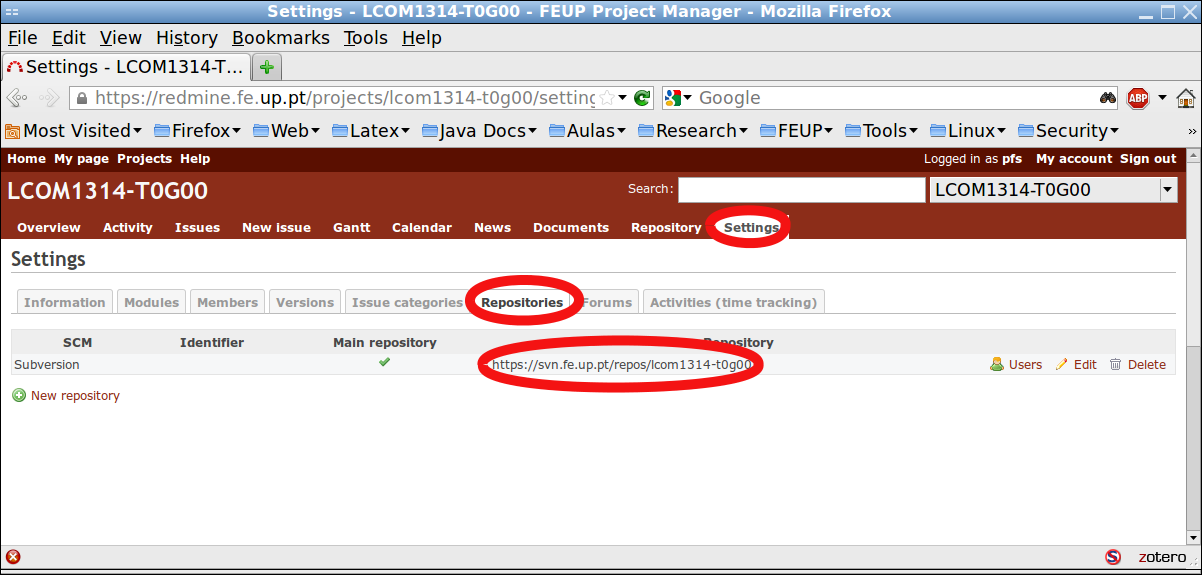
That is, your project should have a Subversion repository configured with the following URL: https://svn.fe.up.pt/repos/lcom1415-tngxy, where the last component lcom1415-tngxy is the identifier you should have given to your project.
If you find no Repositories tab, and you created your project more than 15 minutes ago, go to the Modules tab of the Settings tab of the project to check if the Repository
module has been selected. If not, check it again, and check if the repository was created a few minutes later.
If after several attempts, the Repositories tab has not been created, you may have to visit CICA's helpdesk so that they fix the problem for you.
If you find a Repositories tab, but the URL is not as specified, check the identifier you have chosen for your project. If it is not as specified above, you made a mistake in the input of the project identifier. Please follow the instructions in Annex 1 to fix this.
You should also check the name of your project. If it is not as specified above, please follow the instructions in Annex 2 to correct the name of your project.
4. Setting Up VMware Player with Minix 3.1.8
We expect that in LCOM you'll develop most of your code for Minix using a Minix image on a virtual machine (VM), more precisely VMware Player, VMPlayer for short. VMPlayer is a "virtualization application" that emulates the HW of a PC. I.e. it is an application that can be used to create, configure and run virtual machines.
When we use a VM we need to consider two OS's. The first one is the OS that runs on the physical machine: this is usually known as the host OS. The second is the OS that runs on the VM: this is usually known as the guest OS. Note that, when running, VMPlayer is like other programs, or better user processes, running on the host OS.
VMPlayer is available for different host OSs, including Linux, MacOS and Windows. It is also able to create and run VM with different guest OSs. In this course, we will use as guest OS only Minix 3.1.8, or better an hacked version of Minix 3.1.8.
On B107, VMPlayer is installed both on Linux, more specifically Ubuntu, and on Windows. All handouts in LCOM, assume that the host OS is Linux. (Because I do not have Windows on my PCs.) You can still use Windows as host OS, if you wish, but you'll be mostly on your own.
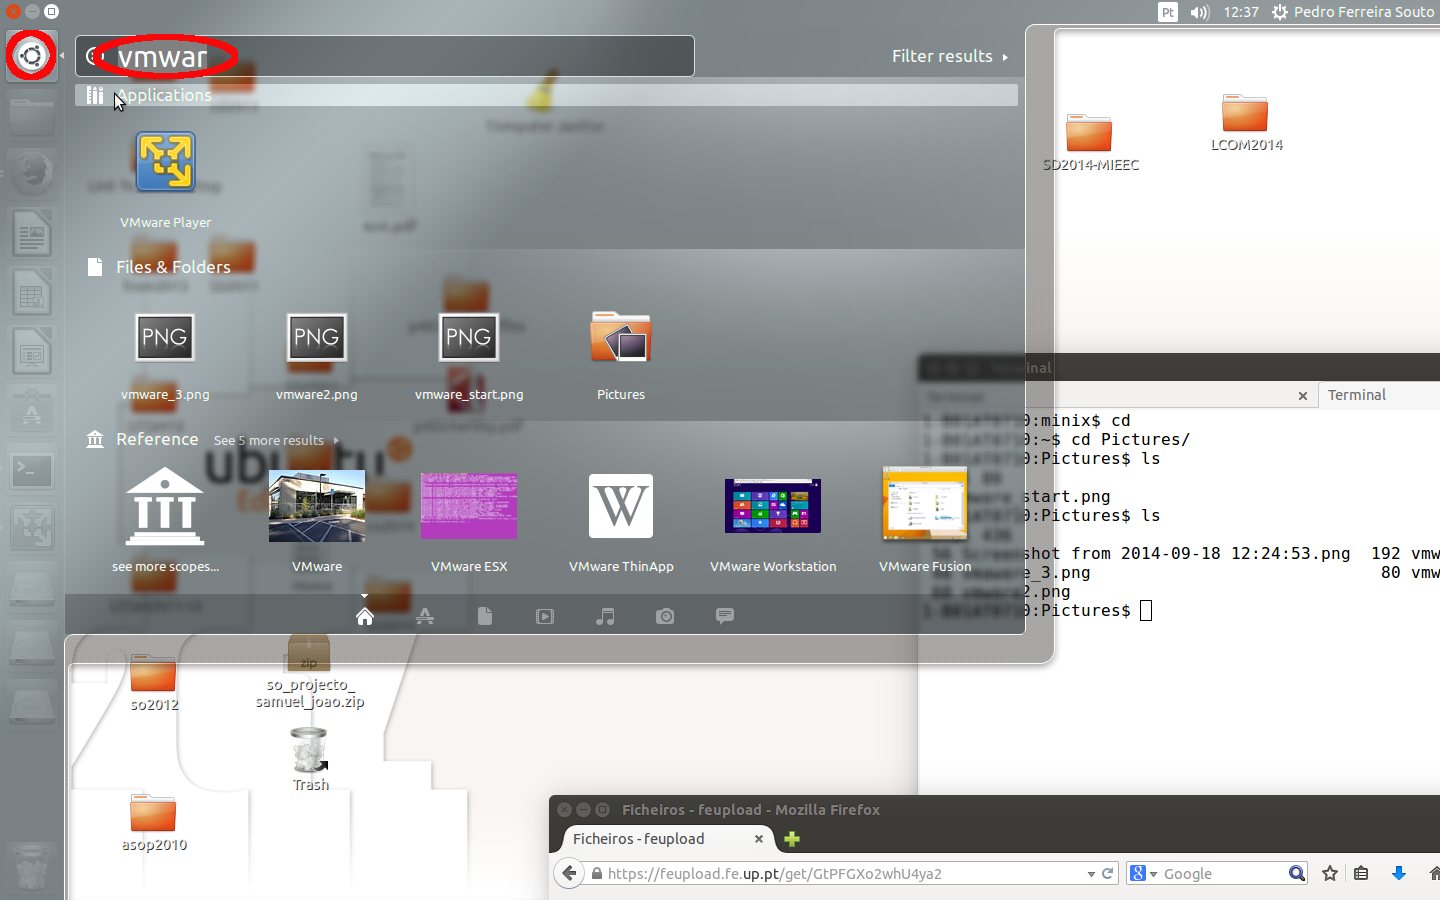
To run VMPlayer on Linux, all you need is to search for "vmwar" on the Dash, a search application that appears on the top of the left-hand-side pannel of the Ubuntu desktop, as shown in the next figure.
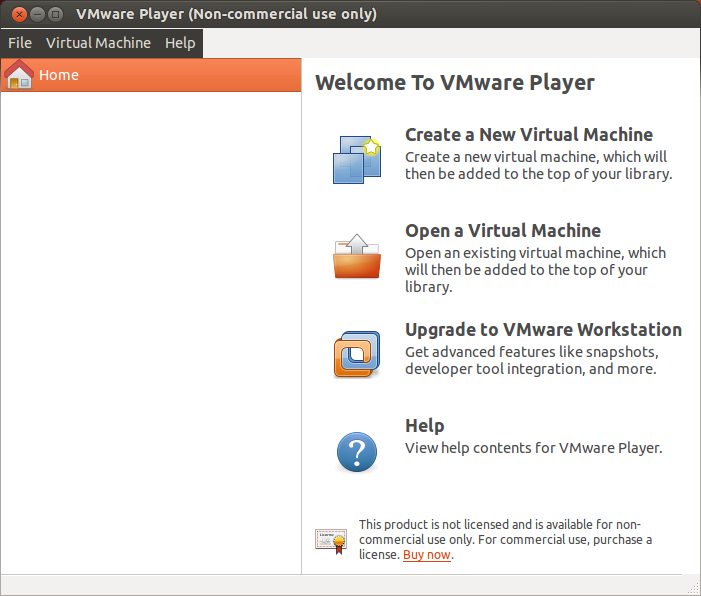
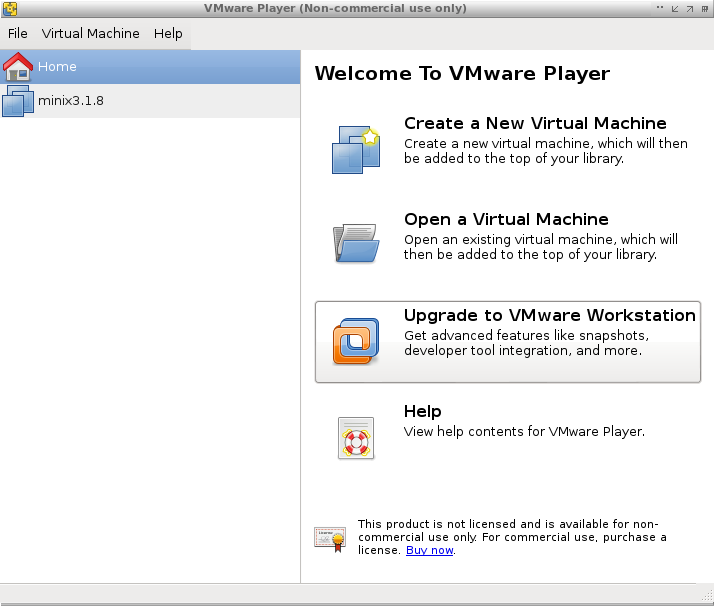
To start the VMWPlayer just click on its icon. A VMPlayer's window should appear on the screen:
Before continuing you need to copy a VM to a place where it may be modified as it runs on your behalf.
4.1 Copying a Virtual Machine
A virtual machine is an emulation of the HW of a PC, on top of which runs the guest OS.
VMPlayer may have several virtual machines each with its own configuration and its own guest OS. When you first start VMPlayer it has no virtual machine defined, thus your first task will be to configure one. And the first step of that task is to copy the files with the image of Minix 3.1.8 for VMware from /opt/Minix-LCOM-clean/ to /tmp/minix3.1.8 by typing the command:
cp -r /opt/Minix-LCOM-clean /tmp/minix3.1.8
on a terminal, which you can start either using the Dash, as done for VMPlayer, or by typing the 3 keys Alt,Ctrl and T simultaneously.
This command will create a directory /tmp/minix3.1.8 with the files that comprise the image of Minix 3.1.8 for VMPlayer that was previously created. Please make sure that you type correctly the name of the directory to be created (/tmp/minix3.1.8) , otherwise there will be a mismatch between the contents of some configuration files of the Minix image and the actual location of the files with the image, and VMPlayer will fail to start.
Note that you'll need to execute this step in every class, because the contents of /tmp are deleted every time the OS reboots. To avoid that, you might be tempted to copy the image to a directory under your home area. The problem with that solution is that it is likely to be slower, because the contents of your area are kept in a disk on a remote server, and its access is relatively slow. On the other hand, if you are configuring your own computer, by all means create a directory with the image in your home area. (However, as I wrote above, you'll need to change the configuration of the VM image. Please read carefully the error message given by the VMPlayer.)
4.2 Opening a Virtual Machine.
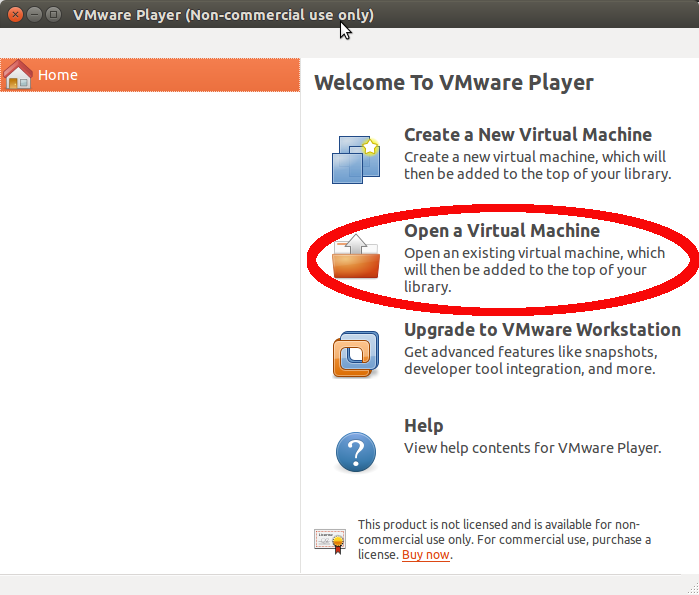
You can now open the VM that you have just copied, by selecting the Open Virtual Machine option on the right-half of VMPlayer's window.
As a result VMPlayer will pop up a window for you to select the VM to open. Choose /tmp/minix3.1.8/minix3.1.8.vmx, by starting your selection from the File System.
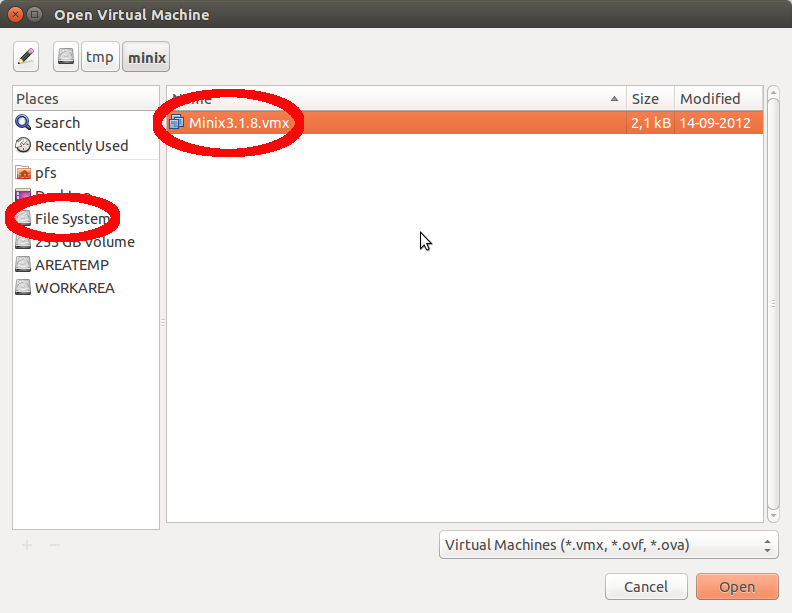
and click on Open. As a result the selected VM will be added to the list on the left of VMPlayer's main window and on the right hand side you'll be shown options to start the VM and to change its configuration.
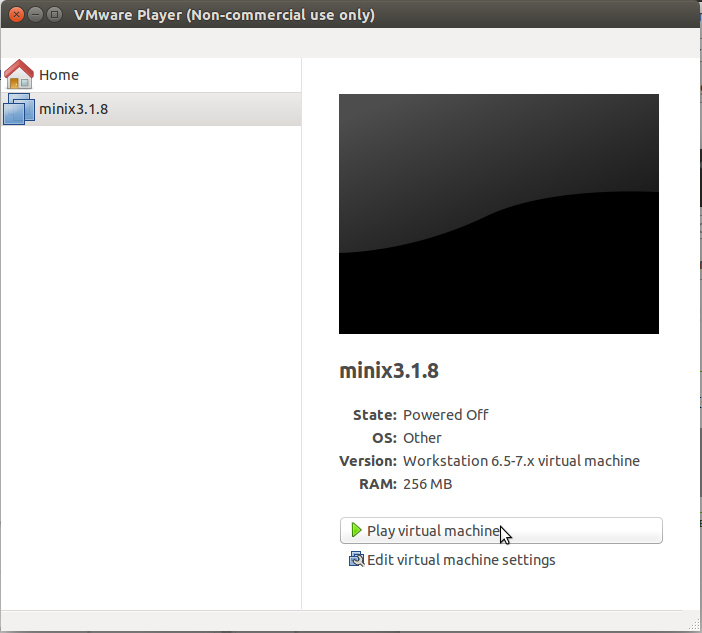
When you open a VM for the first time, VMPlayer automatically adds it to your "library" of VMs. The next time you run VMPlayer, the VMs on you library will be listed on the left-half of the VMPlayer main window, as shown:
and you can select the VM to open directly by selecting it on that list.
4.3 Starting a Virtual Machine
To start the selected VM all you need to do is to click on the corresponding button, Play Virtual Machine on the right-half of VMPlayer's main window.
You'll be prompted by a succession of dialogs including the following:
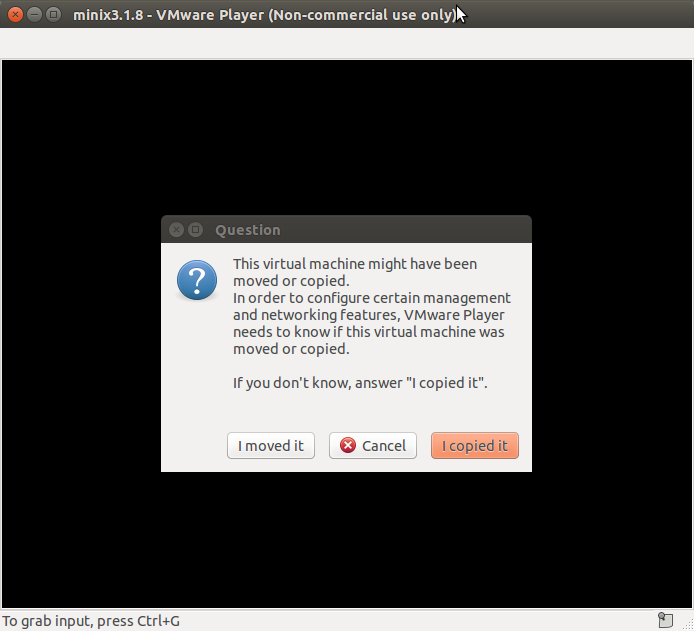
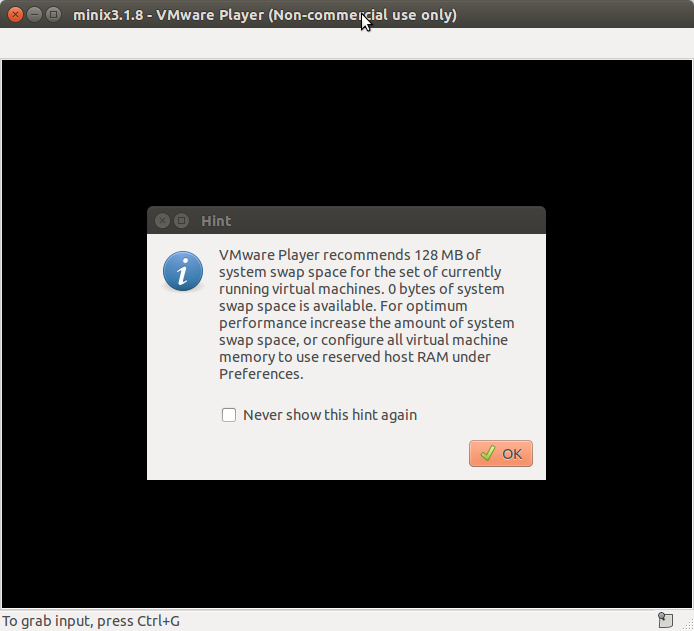
just press the default buttons. Eventually, you will get Minix's bootloader menu, which looks like this:
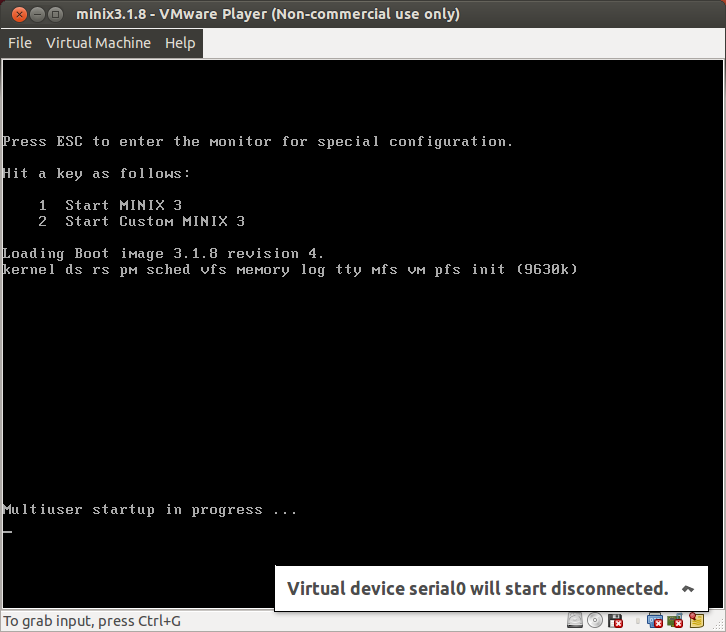
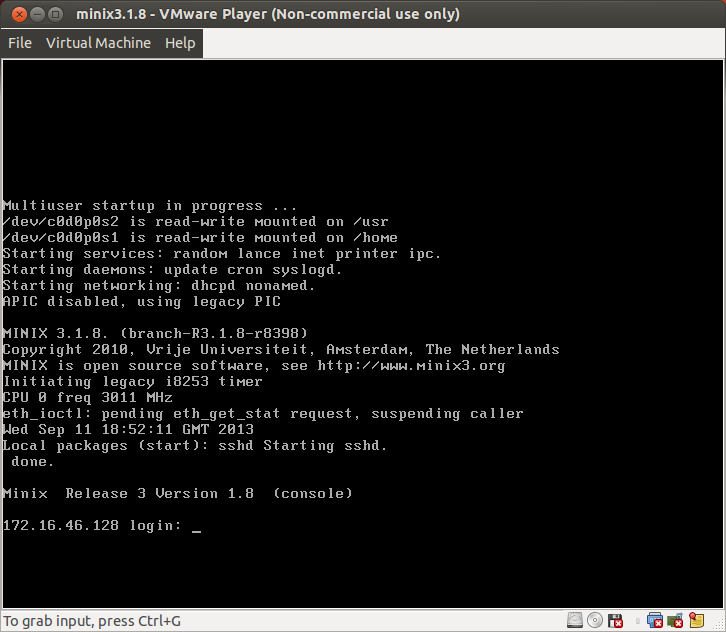
You need not do anything. It will start booting Minix in a few seconds. And after a few other seconds you will get, Minix's login screen.
If you have not read the notes on how to login in the VMware's Minix image, now is a good time to do it.
As described in these notes, in Minix there are two accounts lcom and root, both of which with password lcom. The Minix image has only a command line interface (CLI), and you can login directly on the VMPlayer window, as you would on a computer terminal. But before, as indicated by the message at the bottom of VMPlayer window, you need to place the mouse cursor on that window and press Ctrl+G so that the keyboard input is forwarded to the VM. An alternative is to click the mouse's left button, but it does not always work. To get the keyboard/mouse input forwarded to Linux, you will have to press Ctrl+Alt, as displayed in a message at the bottom of VMPlayer's window.
Pressing Ctrl+G and Ctrl+Alt to go back and forth between Minix and Linux is somewhat inconvenient. Thus, you may wish to use ssh on a Linux terminal instead. This is described in more detail in the login notes already mentioned.
Either way, to edit the source files of your programs, you may wish to use a modern integrated development environment (IDE) like Eclipse with the Remote System Explorer (RSE) plugin. This is described in the next section.
Note: Do not power off the VM, as you'll need it to use the RSE plugin.
5. Using Eclipse's Remote System Explorer Plugin
In the remaining of this handout we will describe how you can develop a program in the image on the VM. Therefore, whenever we mention Minix we mean the Minix 3.1.8 image on the VM.
Eclipse's RSE plugin is described in its User Guide as follows:
The Remote System Explorer (RSE) is a perspective and toolkit in Eclipse Workbench, that allows you to connect and work with a variety of remote systems. With the predefined plug-ins, You can look at remote file systems, transfer files between hosts, do remote search, execute commands and work with processes.
Basically, the RSE plugin allows you to edit files that are stored on a remote system. In LCOM, in the computers of the B107 lab, you will run Eclipse on Linux (although, in principle you can also do this in Windows as the necessary applications are also installed on that OS) and use RSE to edit files on the Minix installation running on the VMPlayer. You can use it also to run the compiler and to run the compiled programs, although I prefer to use ssh on a Linux terminal for that. Of course, your preferences may be different. Again, in principle, you may also run Eclipse with RSE on Windows, however I've not tested it in the PC's of B107.
5.1 Running Eclipse on Linux
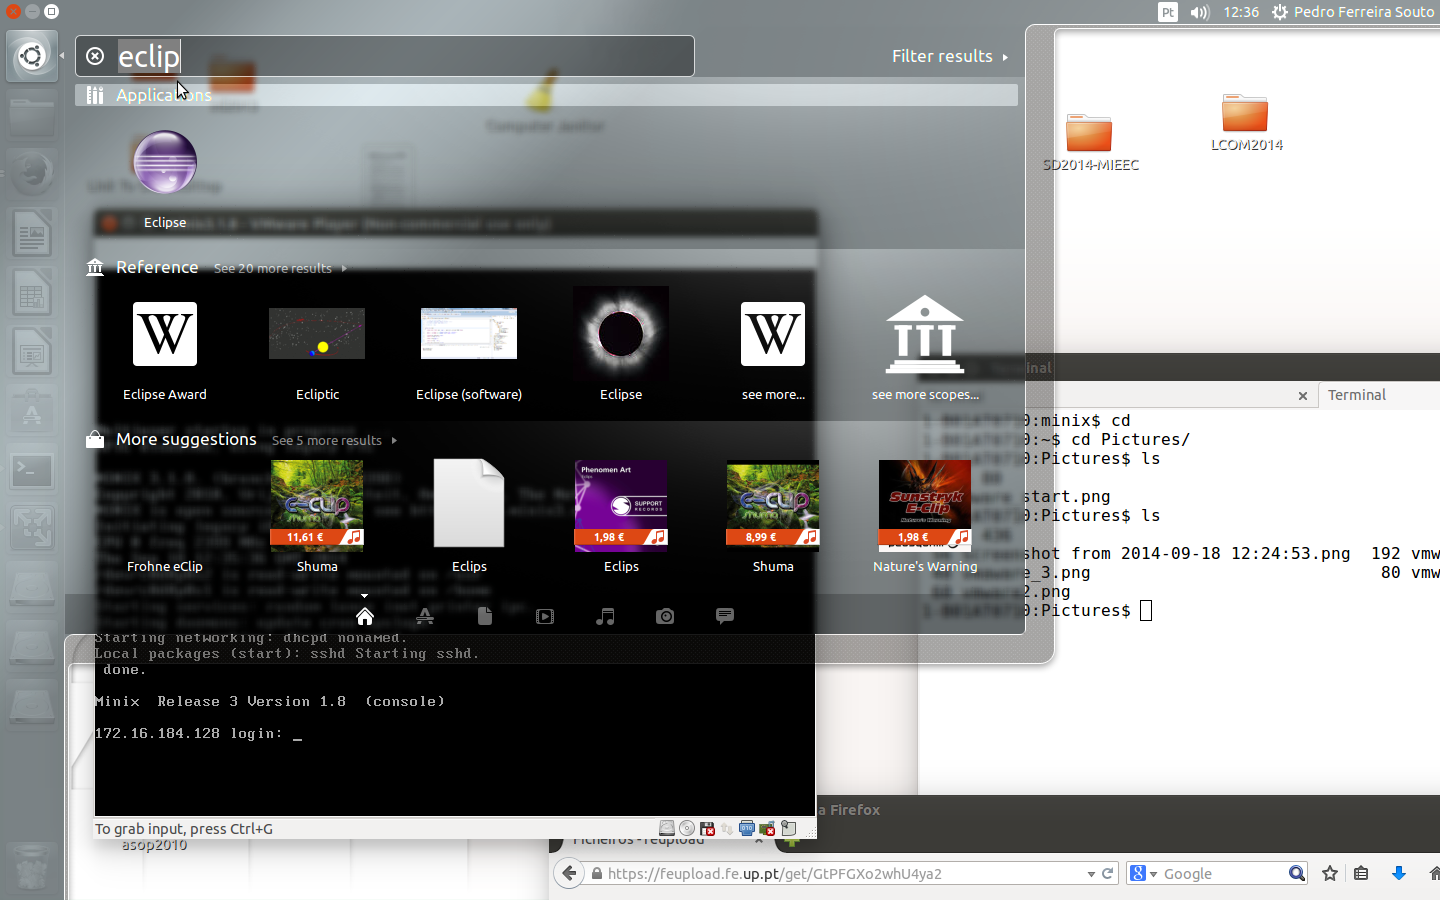
To run the RSE plugin, you need to start Eclipse. Again, you can find Eclipse using Unity's Dash on Ubuntu Linux, following the steps described above to run the VMPlayer.
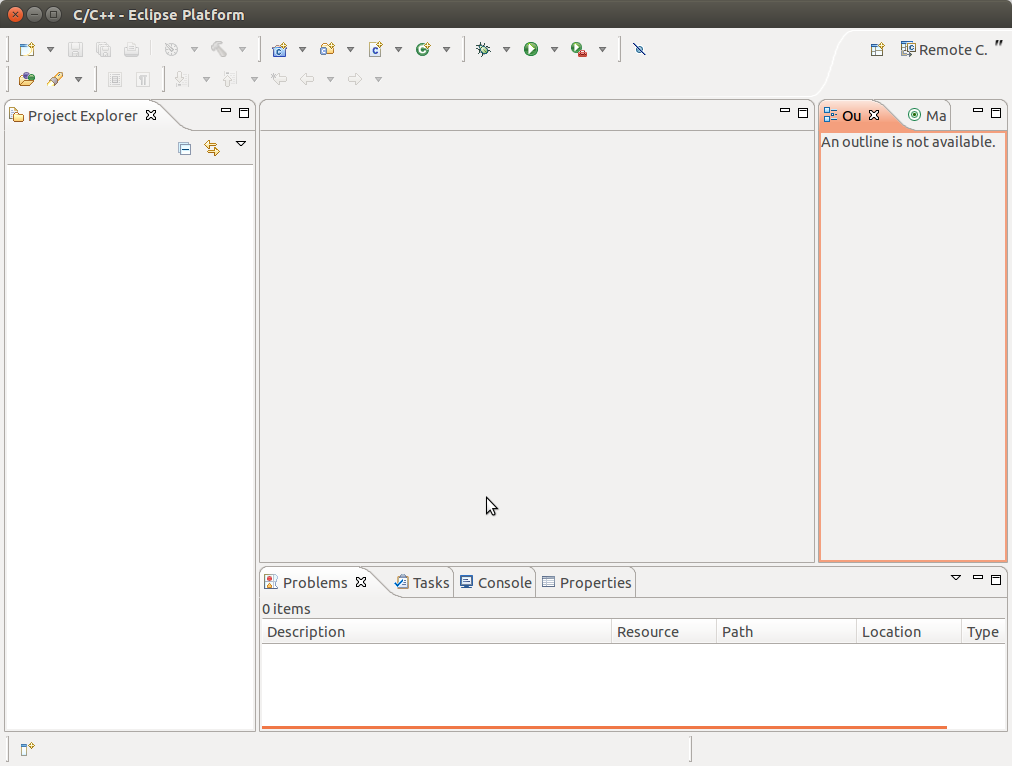
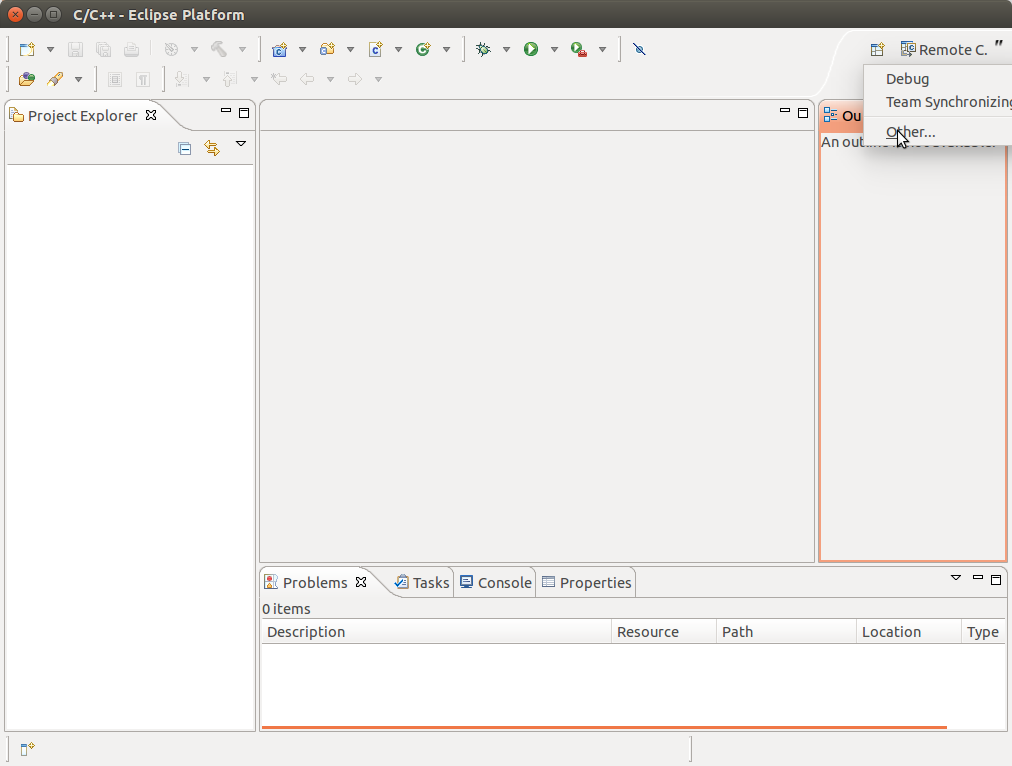
By clicking on Eclipse's icon, Eclipse starts on its default perspective:
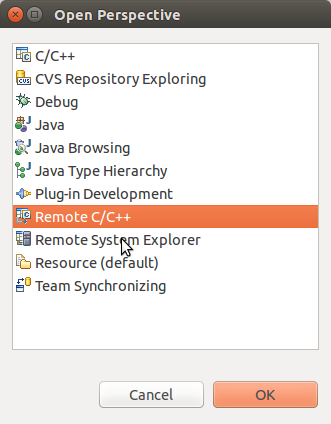
To access Minix on VMPlayer, you need to select the RSE perspective, as shown below
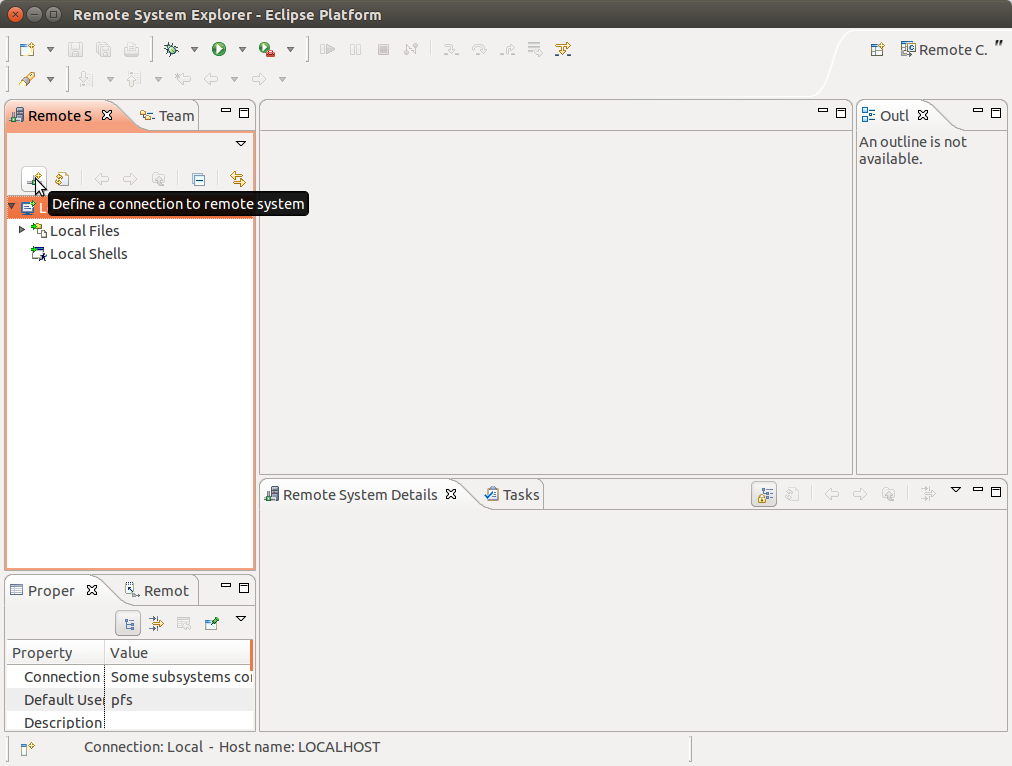
5.2 Configuring RSE to connect to Minix
Now you need to configure RSE, i.e. define a connection to Minix, by selecting the corresponding icon on the Remote Systems view.
At this point you should choose SSH Only as the type of connection, and fill in the window to define the connection properties as shown:
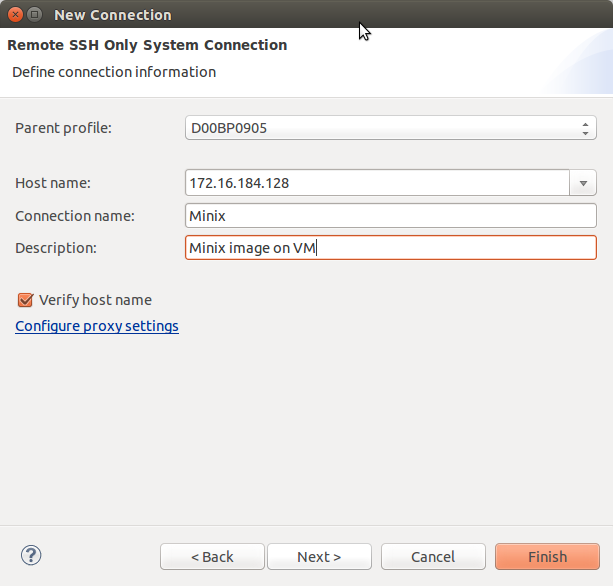
The critical information to fill in is the Host name field, which must be filled with the IP address of the VM that Minix is using. (We describe next, how you can find out this address.) The connection name, may be any you deem to best describe this connection; it will be shown in the list of connections of the remote system view. I used Minix. The description is not very relevant, and probably you can leave it empty. Finally, because we are using the IP address as the host name, it is irrelevant whether or not you check the Verifiy host name box.
The IP address of the VM that Minix is using may be read from Minix's login prompt, as shown:
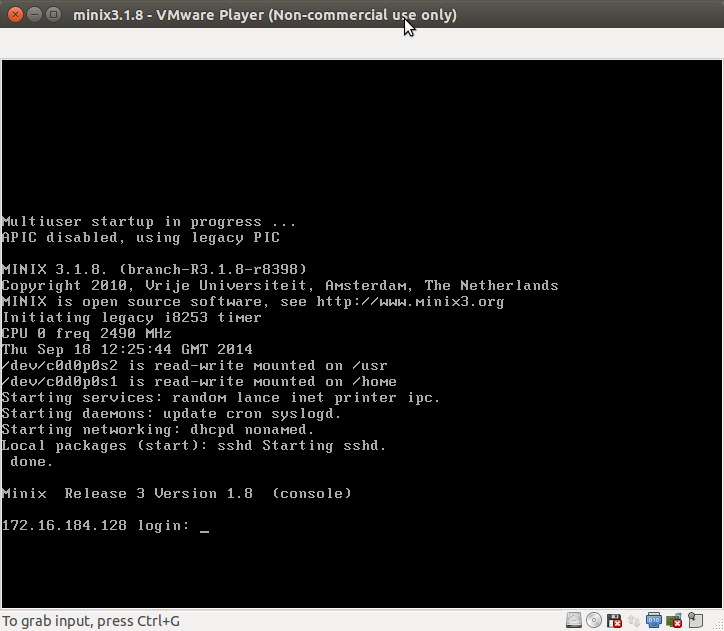
Alternatively, you may use the command ifconfig on one of Minix's command line interfaces:

That's it, you can press the Finish button and you'll see the connection you just created on the Remote Systems view:
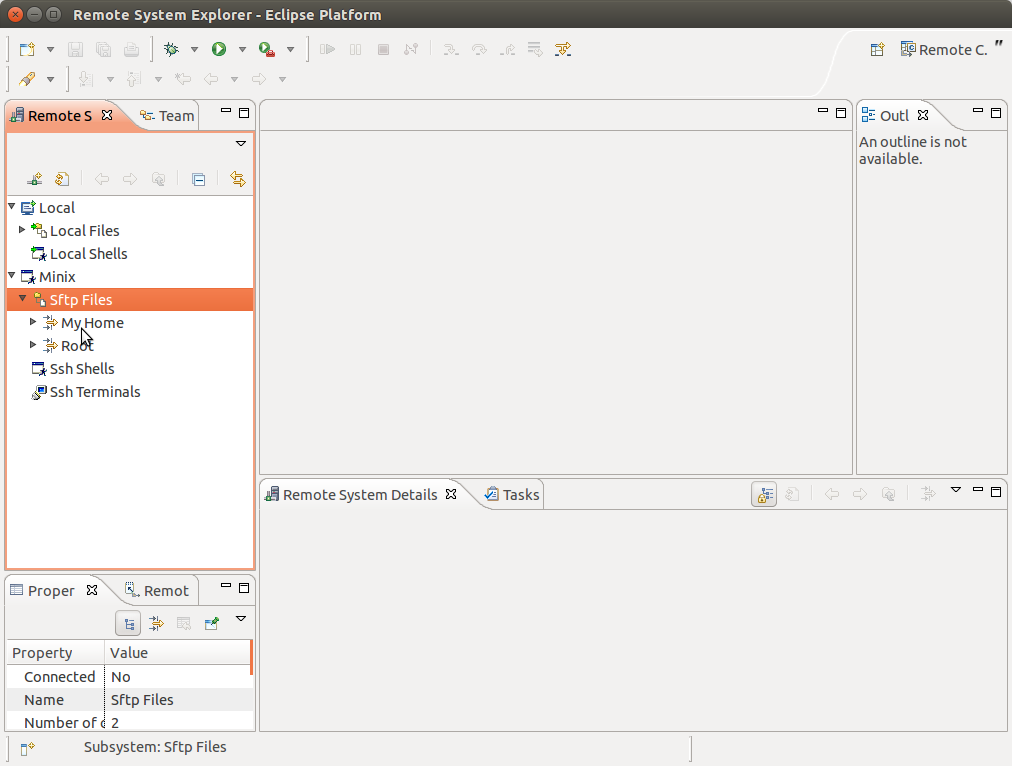
5.3 Using the RSE plugin to work on Minix
You can use the RSE view on the left to browse lcom's user space on Minix, labeled My Home, or the Minix root file system, labeled Root. By clicking on any of these directories, you'll be prompted to (remote) login on Minix:
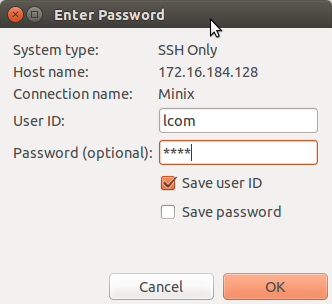
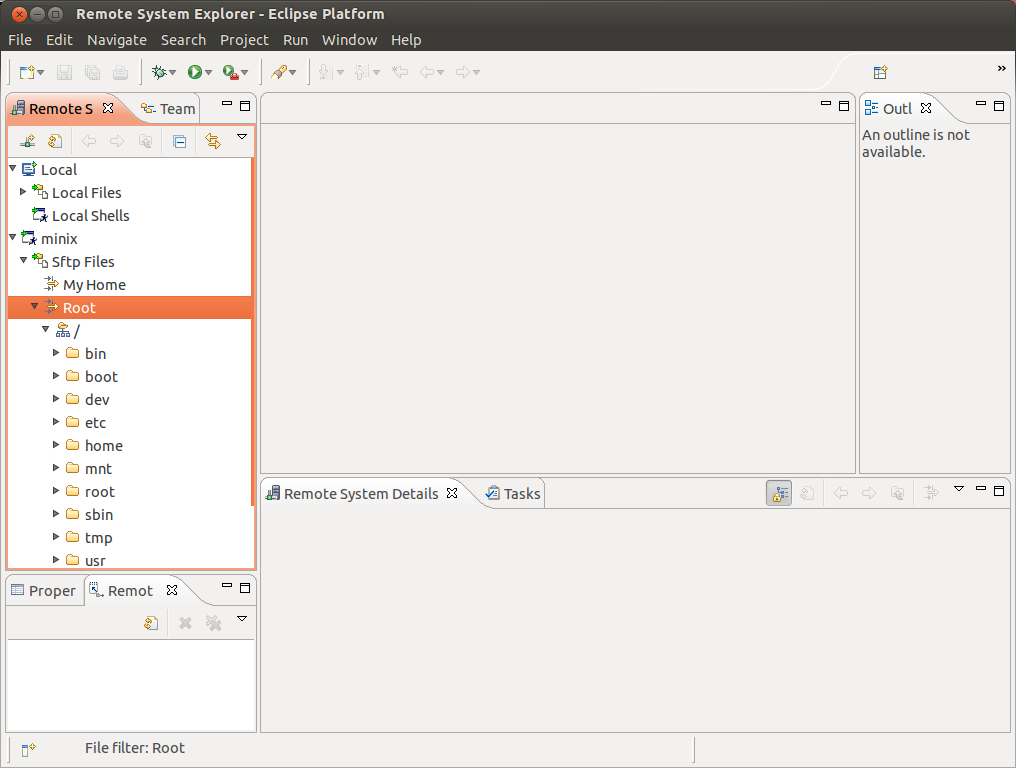
Login as user lcom, remember its password is lcom. If you wish, Eclipse can save your credentials on Minix, by checking the corresponding boxes. After pressing the OK button you should be logged into Minix, and you can now browse the content's of its (virtual) file system
The lcom's user space on Minix contains only a few hidden files and they will not be shown, therefore My Home appears empty. (It is possible to change this behavior, but there is no need in LCOM to see hidden files.) The following snapshot shows the content's of Minx's root directory.
By clicking on My Home with the mouse's right button, Eclipse will show up a menu. By clicking the New entry, a submenu that allows you to create a new file or a new folder is shown. I suggest that you create first a directory (folder) named lab0 for this lab. The RSE view will show the new directory under My Home.
Now, move to that directory and create a new file, with name hello.c. A file with this name will now appear in the RSE view under the lab0 folder. To edit it, double click with the mouse's left button. This will show an empty canvas in the middle of the Eclipse window. You can now write an "Hello World" program.
To compile and run the new program you need a CLI on Minix. (Of course, you may also use this kind of interface to create the lab0 directory, or even to create hello.c file.) There are at least 4 alternatives to get one:
- The Minix console on VMPlayer
- A remote shell on a Linux terminal, by using ssh
- A remote terminal using Eclipse's RSE
- A remote shell using Eclipse's RSE
The latter behaves in an unusual way. Therefore, if you wish to use Eclipse's RSE, select the Ssh Terminals under the minix connection. You will get an remote terminal inside Eclipse's window, as shown:
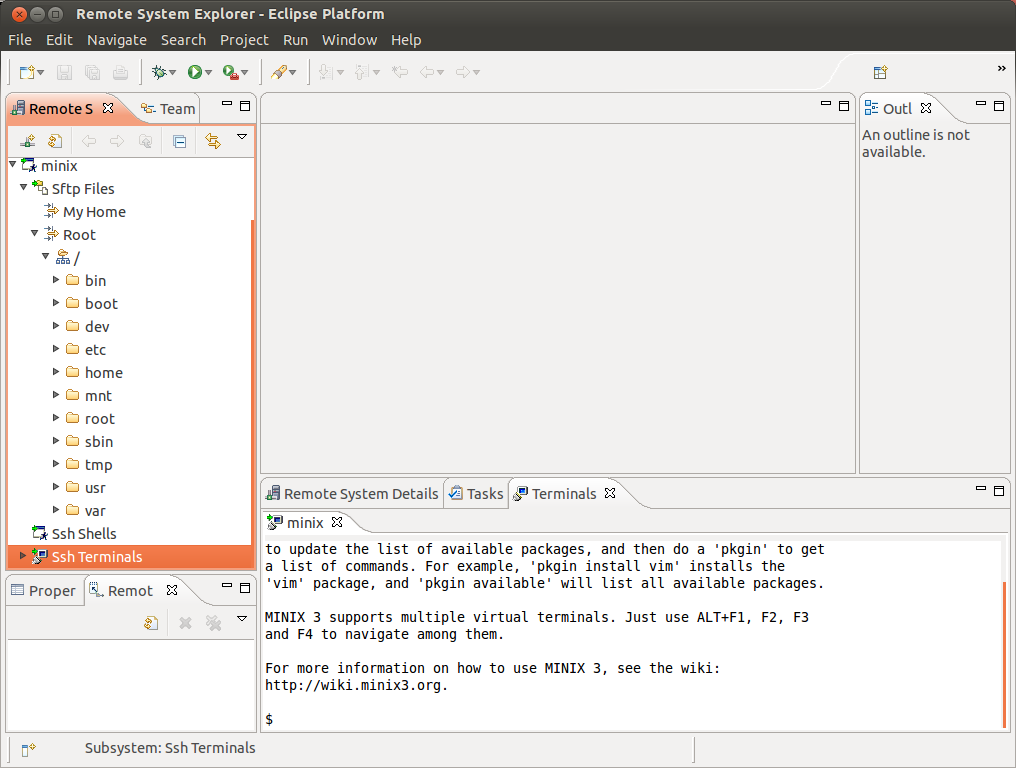
You can use several remote shells simultaneously, one per Linux terminal. These shells can be used together with the remote terminal available via RSE.
Anyway, to compile an run your program, on the CLI of your choice, just execute the following commands:
$ cd lab0
$ gcc -Wall hello.c -o hello
$ ./hello
You may wish to try using multiple remote terminals/shells. For example, use one to compile your program, and another to run it. This will be very convenient on future labs, as you should compile your programs as user lcom, but you can run them only as user root.
Note: The Minix 3 image also has a couple of text-based editors, including vim, a somewhat sophisticated editor (although I'm not a vim user and do not know which features are supported in Minix's version), and nano, a simple and easy to use editor. You can use them directly from Minix CLI either on the VMPlayer or by running ssh on a Linux terminal or even on RSE ssh terminals (do not try to run them on RSE's ssh shell.) My advice is that you stick to Eclipse's default editor.
This is all for today, folks. But if you wish, you can try to set up LCOM's development environment on your own laptop.
6. Setting Up LCOM's Development Environment
Essentially, LCOM's development environment consists of:
- Minix 3.1.8 running on a VM
- Eclipse with the C development tools (CDT) and the RSE plugin
In the B107 lab this environment is setup in Linux (and on MS Windows), but you can set it up in Windows or in MacOS as well. (Either directly on these OSs, or by running a VM with Linux.) Furthermore, we are using VMware Player as virtualization application, although in previous years some students have also used the VirtualBox, especially under MacOS, as there is no VMware Player for MacOS, and VMware Fusion is not free.
The Windows Virtual PC from Microsoft may also be an alternative under Windows, but according to the Wikipedia this dates from February 2011, which may mean that either this is a superb program (as both VMware Player and VirtualBox have seen several updates since that date) or that Microsoft has lost interest in this product. (Pick your choice.)
Thus, the steps you need to set up LCOM's development environment are as follows:
- Download and install a virtualization application (both VMware Player and VirtualBox were used successfully in the past) for your OS.
- Download the my VMwares's image with Minix 3.1.8 (I've changed the kernel slightly, the standard Minix 3.1.8 will not work for LCOM's labs) and unpack it in your home area
- Import the VMware's image with Minix 3.1.8 to the virtualization application you chose. (In the case of VMware Player, you just need to follow the steps above in Section 4, and change the configuration of the VM, because the location of your VM will not be
/tmp/minix3.1.8)
- Download and install Eclipse with the C Development Tools (CDT) and the RSE plugin. These tools/plugin can be installed by selecting the "Install New Software" option of the Help drop down menu in Eclipse. If you are installing on Linux, it may be more convenient to install the appropriate SW packages of your Linux distribution.
- Configure the RSE plugin to connect to the Minix image on the virtualization application, as described in Section 5.
To help you on this task, you may wish to check the first two of a set of tutorials on Minix written by Henrique Ferrolho, an LCOM's student last year.
Have fun!
Annex 1: Fixing a Wrong Project Identifier
If you made a mistake and the project identifier you entered does not follow the rules we have specified, it is still possible fix things by creating a new project: as stated above, a project identifier cannot be changed, once assigned.
If you made a mistake only on the project identifier, that is the project name is correct, you need first to change the name of the first project you created, e.g. by appending the string "-OLD" to that name, as described below. This is because although you can change a project's name, it must be unique.
If you made a mistake on the project name as well, you can "forget" about that project an all you have to do is to create a new one, with the right name and identifier, by following exactly the instructions provided in Section 3.2.
Annex 2: Fixing a Wrong Project Name
Fixing a wrong project name is easy. All you have to do is to select the Settings tab, and then the Information tab and finally edit the Name text-box, and change it to the correct name.
To make you changes effective, just click on the Save button.